Rowland is a member of the Voyager team with the role of Voyager Evangelist. The information in this blog post is based on pre-beta software installed in early 2022. The final release will almost certainly have changes based on beta testing feedback.
Overview
RoboTarget is Voyager Advanced’s automated scheduler. In real time, it chooses an appropriate target to run from a database of targets you create, using constraints you add to control when a target can be imaged. In this blog post, we’ll take a look at the RoboTarget Manager, which is the user interface you use to create entries for each target you would like to shoot.
RoboTarget Manager Startup and Organization
RoboTarget is Voyager Advanced’s automated scheduler. In real time, it chooses an appropriate target to run from a database of targets you create, using constraints you add to control when a target can be imaged. In this blog post, we’ll take a look at the RoboTarget Manager, which is the user interface you use to create entries for each target you would like to shoot.
There are a couple of ways to bring up the RoboTarget Manager. You can click its icon in the very top bar of the window:
You can click RoboTarget from the Section tab, and then click the RoboTarget Manager button that appears in the RoboTarget section:
You could also add a shortcut to the VoyagerRoboTargetManager.exe program file in the Voyager program directory and run it from there.
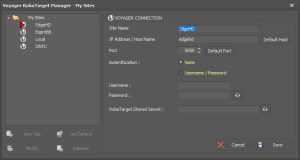
Finally, you can run the RoboTarget Manager on a different PC than the one that runs Voyager to control your scope, connect to the remote PC and remotely manage the target database that resides there. RoboTarget Manager has a Site Manager built-in where you can define multiple local or remote sites, including their IP address, a shared secret (character string) used to authorize your connection, and more. We’ll examine this in more detail in a later blog post.
For now, we’ll just run RoboTarget Manager on the same machine as the Voyager instance that will run RoboTarget.
As installed, RoboTarget Manager defines one site called “Local,” which is the PC it is running on. Click the Connect button to connecto the local Voyager instance, which must be running. RoboTarget Manager connects to Voyager’s application server, which must be running.
Once connected, you’ll see a list of the profiles defined for that Voyager instance, with the active profile outlined in red:
Base Sequences
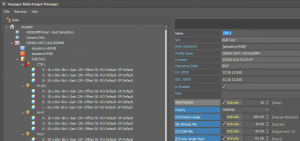
Under the profile are one or more “base sequences” associated with the targets you have defined for the profile, and the disk drive icon, in this case labeled RGB Test, which expands to a set of one or more targets.
Base sequences define the actions to take when running a target, except for the overrides that are contained in the target definition. Think of the base sequence as the starting point for how you want to shoot a target. Every target definition includes a base sequence. A set of targets can all use the same base sequence, or you can define multiple base sequences and attach them to the targets in any way you like.
Only sequences found in the top-level ConfigSequence folder (under your Voyager folder) are available for use as base sequences.
For safety, only sequences associated with the current profile can be used as base sequences.
Add a base sequence by right-clicking the profile icon and selecting Add Base Sequence from the menu:
A drop-down list appears in the right panel listing all your Voyager sequences. Choose one to be the base sequence, and optionally designate it as the default base sequence. Check the box to enable it if you want to use it.
Target definitions include at a minimum the target name, coordinates, and shot definitions (e.g. XX shots of YY seconds with ZZ filter, etc.). It may also include constraints that override the base sequence such as minimum target altitude, position angle, min and max start times, and more.
The blue question mark icon to the left of the target name indicates that the data has not yet been loaded for that target. Click on a target and it expands to show the shots defined for that target.
Each shot definition includes the same items that would be in a “shot slot” in a Voyager Basic sequence. Filter, number of exposures, length, binning, gain, offset, etc.
It’s worth taking a little time to decide how you would like to use the Set of Targets grouping feature. You can group targets in any way you like – think of it as a folder that has no intrinsic properties other than grouping targets together. However – and this is big – you can enable or disable all the targets in a set with one click in the Set of Targets folder definition. And if you use the same base sequence for all the targets in a set, you can make changes to the base sequence and know that all targets in that set will get your changes to the base sequence.
You can have multiple sets enabled at once – or just leave everything enabled. But there is some convenience to being able to easily enable a whole set of targets with one click, so think through your imaging scenarios.
For example:
1. Group by filters used – RGB, LRGB, HLRGB, SHO, HO
2. Group by target type – Galaxy, Planetary Nebula, Globular Cluster, etc.
3. Group by season – Winter, Spring, Summer, Fall. The only problem with this one is targets don’t all neatly fall in these buckets.
If you decide to just add a few targets to the database and then run them, this choice of how to group them is less important. I like to add a lot of targets to the database – it becomes my “wish list” – so the organizational choice is worth some pondering.
Now that we’ve looked at how targets are organized by the RoboTarget Manager, let’s actually add a target.
Adding a New Target
To add a new target, right click on the Set of Targets icon where you want to add the target.
This opens a context menu. Select Add New Target. Note that from that right-click menu, you could also enable or disable all targets in that group, reload the data from the RoboTarget database, or remove the entire set – use that one with caution!
You can also copy and paste an existing target and/or its associated shots, by right clicking the target and selecting Copy or Copy All Target Shots, and then right clicking the set icon and selecting Paste Target or Paste Target with Shots.
Define a “dummy target” for a target set with your “normal” shots and constraints for targets in that group and you can very easily add a new target with shots and constraints defined by just copying and pasting the “dummy” and then choosing the target name and coordinates.
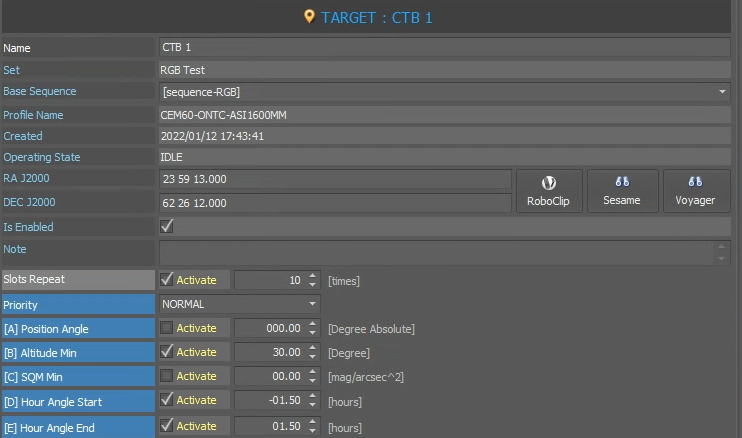
Adding a new target (or clicking an existing one) opens up the details pane on the right:
This panel defines your target’s attributes and the constraints that control when it becomes eligible.
Name: Your target’s name, such as M31
Set: The target set to which this belongs
Base Sequence: Select the base sequence from the drop-down list. This defines how to run the target, subject to overrides from this target definition. Barring the choice of another one, the default base sequence of the target set will be used.
Profile Name: The Voyager profile under which this target runs
Created: The date and time you add this target to the database. Used by some of the schedulers to choose what to run when there is more than one eligible target. E.g., the default scheduler runs the oldest target (the one added to the database earliest).
Operating State: The current status of this target
IDLE: Not completed yet, not running
RUNNING: Not completed yet, running
SUSPENDED: Target has been suspended due to a scheduler error, sequence error or user action. More on this below.
FINISHED: All shots have been taken, target is complete
RA J2000: Right Ascension of the target in J2000 coordinates
DEC J2000: Declination of the target in J2000 coordinates
RoboClip: Click to bring up the RoboClip database manager and choose your target from one in that database. The RoboClip database is a feature of Voyager Basic. It provides a user-maintained database of targets.
Sesame: Click to search the Sesame online search name resolver at http://cds.u-strasbg.fr/cgi-bin/Sesame. Requires an Internet connection
Voyager: Click to search the planetarium connected to Voyager
Is Enabled: Checked if this target should be considered by the scheduler when building the list of eligible targets
Note: A free-form text field where you can enter any comments about the target
Slots Repeat: If the Activate box is checked, the shots defined for this target will be repeated the number of times specified.
Example: for the target M 102 shown below, I have defined four shot slots – 20 exposures each of R, G, B and L. In the Slots Repeat field, I checked Activate and set the number of repeats to 5. With these settings, RoboTarget will run this target until it accumulates 100 exposures of each filter. The target will run over multiple sessions if necessary, and progress against each filter’s desired number of exposures goal will be tracked.
Constraints
A big part of automated scheduling’s “magic” is in the specification of constraints – conditions under which a target becomes eligible.
Leo expects to add more constraints here after the beta period, so consider this a starting set, not the final ones.
Only constraints with the “Activate” field checked will be enforced.
All constraints whose “Activate” field is checked will be “AND’ed” together – the target will only be eligible if they are all met.
Constraints must be valid for the minimum duration of a sequence for the target to be eligible. The minimum duration is specified in the RoboTarget section under Advanced Settings. By default it is 15 minutes.
Constraints specified in the base sequence are ignored.
I’ll use the phrase “eligible targets” to indicate the set of targets whose constraints have all been met and are thus eligible to run.
Priority: Select from the drop-down: VERY LOW, LOW, NORMAL, HIGH, FIRST. Among eligible targets, the highest priority ones will be run first. There are many ways to use this. For example:
1. Give broadband targets higher priority than narrowband but specify the moon must be down for broadband targets to run. This means your eligible broadband targets will run when the moon is down rather than narrowband.
2. Give high or first priority to a short-lived target such as a comet or supernova
3. Give low priority to targets you have “completed” but if nothing else is eligible, you’d rather get more data on them than sit idle
Position Angle: If a rotator is connected, use the specified position angle. When you import a target from RoboClip, the PA will be imported and this constraint activated. However, if you do not have a rotator configured in Voyager Setup, this is ignored – it will not interfere with your run
Altitude Min: The target’s altitude must be at least the specified value to become eligible
SQM Min: The current reading of an attached SQM device must be equal or greater than the specified value
Hour Angle Start and Hour Angle End: You can use these separately or together. The Hour Angle is specified relative to the meridian. E.g., an HA of 1.0 is one hour past the meridian. An HA of -2.0 is 2 hours prior to the meridian.
Hour Angle Start: The target only becomes eligible when its hour angle is equal or greater to the specified value
Hour Angle End: The target only becomes eligible when its hour angle is less than the specified value
Examples:
1. This contraint is met if the target is between 1.5 hours before and 1.5 hours after the meridian:
2. This constraint is met if the target is between 1 and 3 hours after the meridian:
3. This constraint is met if the target is between 2 hours before the meridian and at the meridian:
Date Start: The target is eligible only if the current date is equal or greater than Date Start
Date End: The target is eligible only if the current date is less than or equal to Date End
MIN Allowed Time Start: The target is eligible only if the current time is equal or greater than the specified value
MAX Allowed Time Start: The target is eligible only if the current time is less than the specified value
Moon Down: The target will only be eligible if the moon’s altitude is X degrees or less, where X is the value of the Moon Down Altitude field in RoboTarget Action -> Advanced Settings panel (see below). May be negative to indicate below the horizon.
Moon Phase Min: The minimum moon phase for the target to be eligible
Moon Phase Max: The maximum moon phase for the target to be eligible. Note: if Activated, this constraint will be observed even if the moon is down.
Moon Distance: The minimum angular distance between the moon and the target for it to be eligible
HFD Sub Max: The sequence will be aborted if the HFD value of the most recent shot exceeds the specified value. The aborted sequence is suspended for 12 hours. The suspension can be removed in the RoboTarget section of Voyager Advance by right-clicking the target and selecting Remove Suspend.
Max Seq. Time for Night: The target will run no more than this number of minutes in a night, unless “Run Targets that have exceeded the maximum Shot time per Night if available” is checked in the RoboTarget Action -> Advanced Settings panel shown above and no targets are eligible that have not exceeded the Max Seq. Time for Night value.
Air Mass Min: The minimum air mass for the target to be eligible. Air mass is the thickness of the atmosphere through which light from the target is passing. Directly overhead is one air mass. Thirty degrees altitude is two air masses.
Air Mass Max: The maximum air mass for the target to be eligible
Reset Constraints: Click to set all constraints to defaults and uncheck all Activate checkboxes
Click the Apply button to save your target, or Cancel to revert any changes made in this form.
At this point, your target has been defined and added to the database.
However, there is nothing to do until shots have been defined. In the next section, we’ll add shots to our target.
Adding Shots
Shots are the definitions of exposures to take of a target. You would normally define them in this part of a Voyager Sequence Configuration:
Each of these rows is a “slot” or “shot slot.” Any values in the slots of your base sequence are ignored. Only the shots defined in RoboTarget Manager are used when imaging with RoboTarget.
There are a couple of different ways to add shots for a target.
Right click the target in RoboTarget Manager and click Add Shot to add a single shot:
Click on the new shot – or to modify an existing shot, click on it – and the shot definition panel appears on the right:
In this panel, you can choose the type of shot – LIGHT, BIAS, or DARK. Flats are handled with Voyager’s AutoFlat feature which shoots sky flats or panel flats with automatic exposure length and/or panel brightness adjustments made on the fly.
You also specify the filter, an optional suffix for the file name, exposure length, binning, number of exposures to take, speed, readout mode, and CMOS Gain and Offset.
Finally, there is a checkbox to enable or disable the shot.
Copying Shot(s)
You can add shots one at a time, or copy and paste the shots en masse from an existing target. If you group targets together in a set that all use the same filters and exposures, it will be very easy to copy all the shots from one to another.
Just right click the target with the desired shots and select Copy All Target Shots:
Then right click the destination target and select Paste All Target Shots:
Moving Targets
If you right click a target, select Cut, and then right click a different set and click Paste with all Shots, you will move the target to the other set.
Moving a target in this way preserves progress on that target.
How Shots are Run
Voyager has two basic ways to run the shots in a sequence:
1) Cyclic Round – if there are multiple shot slots defined for a target, cycle around the slots taking one shot with each slot’s definition. For example, if you defined three slots:
Filter R, 5 shots
Filter G, 5 shots
Filter B, 5 shots
With the Cyclic Round approach, Voyager would shoot one each, in rotation, like this: RGBRGBRGBRGBRGB.
2) Group by Slot – all shots with one slot will be taken, then all shots with the next, until the sequence is finished. With the above example, Voyager would shoot: RRRRRGGGGGBBBBB.
The Cyclic Round approach is the best at balancing the number of exposures taken with each filter. This could be very useful, for example, if you have travelled to a dark site for one night and want to get as a set of exposures that is as balanced as possible between filters.
Group by Slot is good if you are not so concerned about finishing the target in one night and want to avoid any overhead associated with changing filters, such as refocusing time. This is especially important if you are taking short exposures as is common with CMOS cameras.
The base sequence is where you specify whether you are taking Cyclic Round or Group by Slot exposures.
Summary
That wraps up a look at adding targets and shots using the RoboTarget Manager.
We’ve covered a lot of ground and a lot of detail.
In practice, adding a new target can take less than a minute once you’ve decided on how you want to organize things, created your base sequence(s) and defined a “standard” set of shots for a type of target.
For example, if I had a standard way of shooting galaxies (shots and constraints) and at least one galaxy target in the database, I could just add a new target, look up its coordinates with one click, and copy the shots over from an existing one.
Done!
In the next blog post, we’ll look at the run-time side of RoboTarget – actually firing it up and watching it automate your night’s imaging.


Click Here to Leave a Comment Below
Leave a Reply: