Overview
RoboTarget is Voyager Advanced’s automated scheduling system that chooses and runs targets from a database of possible targets you create and maintain. See the other blog posts in this series to get an overview of Voyager Advanced, learn about RoboTarget Manager, the user interface to the target database, or the RoboTarget section of Voyager Advanced where you can start and monitor RoboTarget.
By default, the RoboTarget Manager will manage the targets maintained in a database on the same PC. Actually, it will connect to the Voyager application server at the “localhost” IP address, and the application server manages the database.
In addition, you can define one or more remote Voyager RoboTarget “sites,” which are instances of Voyager running on other PC’s. You can then run RoboTarget Manager on one PC (we’ll call this the “client”) and manage the RoboTarget databases on another one as long as you can reach it over the network. The network may be a LAN, a VPN, or the Internet as long as the IP address of the remote machine and the application server’s port number are accessible.
Another excellent way to access a remote machine over the Internet is with ZeroTier, explained here:
This “remote site” capbaility is great if you have more than one instance of Voyager Advanced, or if you simply want to sit in the comfort of your office, run RoboTarget Manager there, and connect to a remote PC that runs your imaging setup. I fall into both categories 🙂 !
Security
You may secure access to a remote site with a username / password combination, and an optional “Shared Secret” which is an arbitary character string used to encrypt traffic between the client and server PC’s.
On the remote PC, open Voyager’s Setup -> Remote panel:
Under Application Server Authentication, choose either None to allow open access, or set a username and password to require a login. Set the username and password in the “Default Remote User” panel and click Apply. Restart Voyager to have these take effect.
If you wish to use a Shared Secret, enter it in the RoboTarget Shared Secret field and click Apply. The new value will be used immediately. You do not need to restart Voyager.
The choices you make here for username / password and/or shared secret must match the values entered in the Site Manager, as shown below.
Client Setup
Make sure you have the latest version of Voyager installed on your client PC so your version of the RoboTarget Manager is current and matches the one on the remote sites. If you don’t have Voyager installed yet on your client PC, download the current version and install it.
Once installed, you can run VoyagerRoboTargetManager.exe to bring up the Voyager Site Manager. You will find it in the same directory as your Voyager main program, which is currently named Voyager2.exe. By default this is the c:\Program Files (x86)\Voyager folder.
For convenience, you may wish to create a shortcut to the VoyagerRoboTargetManager.exe file so it is easy to start.
Voyager Site Manager
In order to connect to a remote site, you first define it with the Voyager Site Manager. You’ll find this in the Remote menu of the RoboTarget Manager. Read about the RoboTarget Manager, including how to invoke it, in Part 3 of this series.
This brings up the Site Manager. On the left, you’ll see a folder with all the sites you’ve defined. When you start, there will be just one, Local, which is the machine Site Manager is running on. Click a site in the My Sites folder to select it. The currently selected site is marked with a red triangle icon – “Local” in this screen shot:
At the bottom left, you’ll find four buttons.
New Site: Create a new, empty site definition
Set Default: Make the currently selected site in the My Sites folder the default site – the one that is selected in the list of sites drop-down menu when you start the Site manager. If you don’t touch the drop-down and just click Connect, this is the one you will access
Modify: Edit the details of the currently selected site in the My Sites folder
Remove: Delete the site definition. This does not delete the site, only the definition of the site in this PC’s Site Manager. You can add it back later if needed
Adding a Site
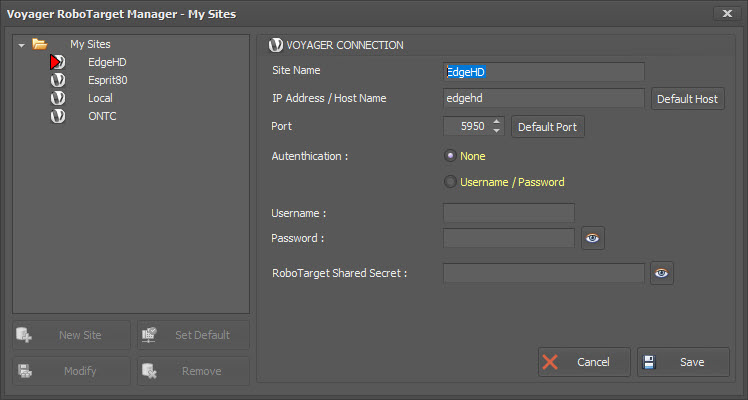
Click the New Site button on the lower left to add a new site. A settings panel opens up on the right:
Site Name: An aribtrary name for this site definition
IP Address / Host Name: The IP address or host name that resolves to the PC containing the remote site.
Default Host: Will reset this to Localhost or the IP address of the local machine. This button label will change to Reset.
Port: The port number of the Voyager application server on the remote PC. The default port number is 5950. This remote PC and port number must be accessible to your computer. If it is behind a firewall, it must be configured to forward the port, or some other means of access such as a VPN must be in place.
Authentication: If the remote application server is protected by a username / pasword, click the “Username / Pasword” radio button and enter the values in the Username and Password fields. Click the “eye” icon to see the password as you type it
RoboTarget Shared Secret: You can further protect communication between the client and remote site with a Shared Secret, which is an arbitray string of characters. It must match the one stored for the remote site.
Click the Save button to save the changes to the site definition, or click cancel to ignore them.
Click the “x” icon in the upper right corner of the Site Manager to close the window.
Connecting to and Disconnecting from a Site
Click the drop-down list under the Voyager Site label to view the list of sites defined in your Site Manager. Note – only sites you have manually added, as shown above, will appear in the list. I.e., this list is not automatically populated if you install Voyager Advanced on a new PC on your network.
Click the name of the site you wish to use, and then click the Connect button.
The Data tree will be populated with information from the remote site, and the Connect button is replaced by a Disconnect button.
To switch to a different remote site, click the Disconnect button, select the new site from the drop-down list, and click Connect.
If you get an error when attempting to connect to a site, make sure the site’s PC and the application server’s port are accessible to the client PC. Make sure the username / password and shared secret match.
Done
That’s it! You can now easily run the RoboTarget Manager from the comfort of your desktop or laptop PC, connecting to a remote PC running Voyager Advanced. If you have mutiple PC’s, you can switch between them and work on your sets, targets and shots.


Click Here to Leave a Comment Below
Leave a Reply: