Imaging with Voyager RoboTarget
Once you have added some targets to the RoboTarget database, if any of them are eligible – visible and with all constraints met – RoboTarget can run them for you automatically at the times that meet the constraints.
There are two ways to invoke RoboTarget, manually or from a DragScript:
–>Manually: Prepare your setup the way you would before running a Voyager sequence – connect your equipment, etc. Then open the RoboTarget section and click RoboTarget Run. RoboTarget will take over and run your gear all night, selecting targets from the RoboTarget database (see Part 3: Voyager’s RoboTarget Manager):
–>From DragScript: Use the RoboTarget action – found under Actions -> Session in the DragScript Editor Elements panel. Add this action to your DragScript instead of the Sequence action, and RoboTarget will start selecting targets and taking shots. The example below just shows the action – you also need to handle the status values returned by RoboTarget.
RoboTarget Settings
When you run RoboTarget manually, its settings are accessed from the gear icon in the lower right corner of the RoboTarget section:
When you run it from a DragScript, the same settings are accessed from the dialog box that appears when you double-click the RoboTarget action in your DragScript. It’s the dialog box shown above in the “running from a DragScript” section of this blog post.
Let’s run through the settings and what they do:
Scheduler Type: The “Scheduler” is the algorithm used to select the target to run from the pool of eligible targets. At this time there is only one scheduler, but more will made available later. The Default scheduler chooses the highest priority target that was added to the database the longest time ago.
Night Type: Astronomical, Nautical or Civil – this together with the Night Start and End Offsets, determines the starting and ending time during which RoboTarget will take shots. Your coordinates, returned by your mount or set in Voyager Setup, are used together with your selections here to determine the clock times for starting and ending the night.
Night Start Offset: The offset, which may be negative, is added to the time computed by the Night Type you choose to determine the starting clock time of your run.
Night End Offset: The offset, which may be negative, is added to the time computed by the Night Type you choose to determine the ending clock time of your run.
Advanced
If there are NO Target Selections from the Scheduler: If the “Run Targets that have exceeded the maximum Shot time per Night if available” box is checked, RoboTarget will run an eligible target rather than sit idle, even if all eligible targets have already run the maximum shot time per night that you chose in the target defintion.
Sequence Minimum Duration: Only start an eligible sequence if its constraints will be met for at least this number of minutes – unless the number of minutes left to finish the target is less than this number, in which case the target will be eligible to run.
Moon Down Altitude: The altitude of the moon in degrees, which may be negative, used in the calculation of the Moon Down constraint.
Scheduler Soft Error Retry: The number of times RoboTarget will retry a sequence when a scheduler internal error occurs. Examples include: cannot start scheduler process, cannot read scheduler ephemeris data, internal action errors
Sequence Max Retries in a Single RoboTarget Run in Case of Error: The maximum number of times a recoverable error can occur in a sequence for a single target for a single night. Each target has its own counter. Examples of the types of errors counted can be seen here in the $$SEQUENCE_FAIL_STATUS possible flags:
https://wiki.starkeeper.it/index.php/DragScript_Environment_Variables
Do not start Sequence for a Target in No Goto Meridian Zone: If checked, RoboTarget will not start a sequence if the target’s position is inside the zone around the meridian which is defined as “No Goto.” These are the values in Setup -> Mount -> GEM Meridian Flip Manager:
Running from the RoboTarget Section
You can run RoboTarget “on the fly” from the RoboTarget Section, accessed from the top toolbar or from the Section ribbon:
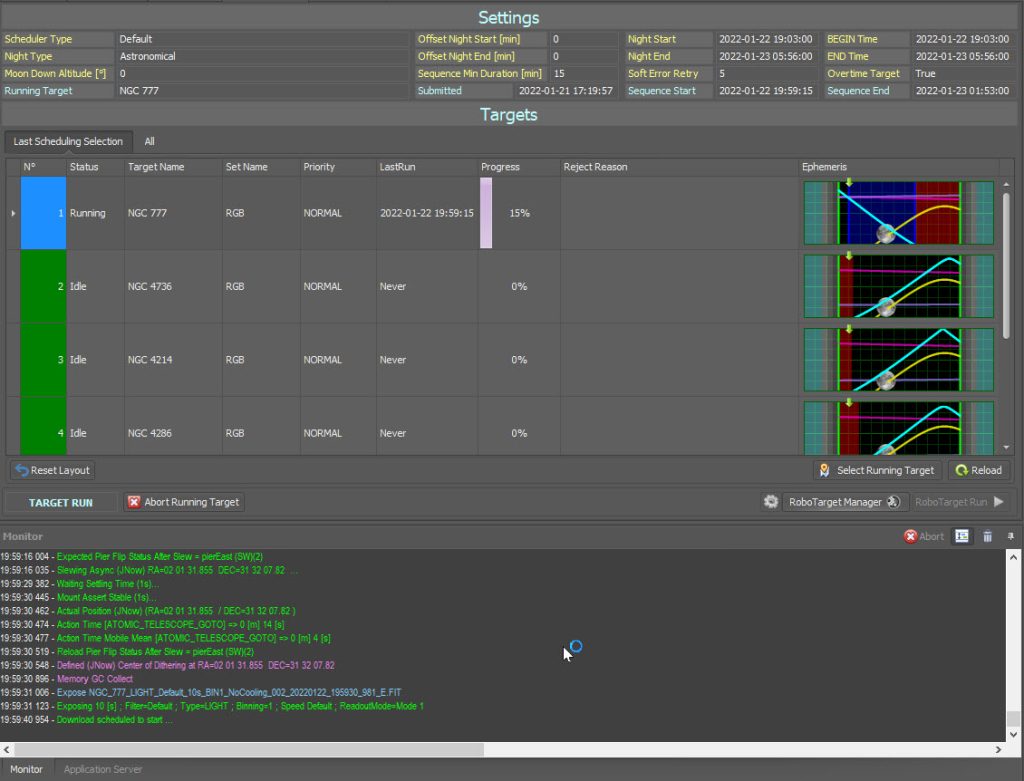
The RoboTarget section is your “dashboard” during a RoboTarget run – you will find useful information here, updated in real time, whether you start it from this section, or from a DragScript:
Let’s take a look at the sections of this screen.
Settings
Most of the yellow captioned fields are values you entered in the RoboTarget settings panel, as explained above. In addition to these, you’ll find:
Night Start: The night starting date and time based on your choice of Night Type
Night End: The night ending date and time based on your choice of Night Type
BEGIN Time: The time your RoboTarget session begins, based on Night Start and the Offset Night Start
END Time: The time your RoboTarget session ends, based on Night End and the Offset Night End
The blue captioned fields provide information about the running target, if there is one.
Running Target: The name of the running target.
Submitted: The date and time the running target was submitted to the RoboTarget database
Sequence Start: The date and time the running sequence started
Sequence End: The latest date and time the running sequence can run, based on meeting constraints. E.g., if the altitude constraint is to run at or above 30 degrees, and the target dips below 30 degrees after 90 minutes, that would determine the ending time. The sequence would end earlier if all shots are completed before this time.
Targets
There are two tabs – you can shoose to view the targets from the Last Scheduling Selection, or All targets in the database.
N°: The target number. If there is a current running target, its Target Number field has a blue background. Idle targets have a green background.
Status: Idle, Running, Suspended or Finished.
Target Name: The name of the target you entered in the RoboTarget database
Set Name: The name of the target set to which this target belongs
Priority: The priority you assigned to this target in the RoboTarget database
LastRun: The date and time this target was last run
Progress: The percent completion of all shots defined for this target in the RoboTarget database, even if multiple sessions are needed to complete the target
Reject Reason: The last reason this target was not chosen, unless the scheduler found a target to run before examining this one. At the beginning of a run, this field is wiped clean for all targets.
Ephemeris: A useful “Night at a Glance” informational panel about each target. The X axis is time.
Green vertical lines: Begin and End Times of action for the night
Blue lines and blue shaded area: Sequence start and end times for the running target
Yellow line: Moon altitude for the night
Cyan: Target altitude for the night
Magenta: Moon phase – scale is 0 to 100%
Blue: Moon distance from the target in degrees, scale is 0 to180°
Red Arrow: The current clock time is outside the graph
Green Arrow: The current clock time when it is inside the graph
Runtime Actions
You can also right-click a target and remove a suspension, if the target had one in place, or abort the running sequence.
The Select Running Target button will bring the running target into view, especially convenient when you have a long list of targets.
The Reload button will requery the RoboTarget database and refresh the target information.
On the lower left, you can see the status of RoboTarget – IDLE in this image. The Status can also be SLEEP, SCHEDULING, and TARGET RUN.
Abort Running Target: Click to abort the sequence for the running target. RoboTarget will enter the SLEEP status briefly, and then look for the next eligible target to run.
Monitor Window
Running RoboTarget from a DragScript
If you are using a DragScript to automate your imaging runs, it’s very easy to swap out the part of your script that calls individual Voyager sequences and substitute a call to RoboTarget instead. It’s just this simple:
I recommend saving your existing DragScript to a new one – perhaps with the word RoboTarget in the filename – and modifying that instead of making changes to your working script.
Then, in your new DragScript, find where you make calls to one or more Sequence actions. In their place, use a block like the one above. To create it, drag the RoboTarget action from the Editor Elements panel. It’s under Actions -> Session.
Note – the RoboTarget action will run from the BEGIN Time to the END Time as defined above. A single call to RoboTarget is all you need to run your entire night’s imaging, including multiple targets should the schedule work out that way.
When you double click it, you will see the settings panel, explained earlier in this post. Choose the appropriate settings and click OK.
Finally, we want to handle the three possible status codes returned by the RoboTarget action. The example above shows a good way to do this, but you may need to make changes to suit your DragScript. ‘
If SKIPPED: This status means the night start, with offset figured it, has not been reached yet. Your DragScript should wait a bit and then try again, as in this example.
If Error: RoboTarget returned an error and you should run your Emergency Exit routine which may include some form of notification and/or shutdown. This status is returned if there is a serious error with your PC, the OS or RoboTarget software such as the database was no longer accessible or corrupted. Before returning this error status, Voyager will retry the scheduling operation the number of times specified in Scheduler Soft Error Retry, which is in RoboTarget Settings. Sequence errors – the normal ones that can occur during the operation of a sequence, are managed by the value of “Sequence Max Retries in a single RoboTarget Run in Case of Error,” which is also in RoboTarget Settings. These errors do not stop RoboTarget’s scheduling.
If TIMEOUT: This status means the end of night including offset has been reached. The DragScript will continue from this point, which is typically your end of night routine.
In a later blog post, we will examine the All Night DragScript provided by the Voyager team and look at how to adapt it to your environment. It can automate your entire operation from startup to shutdown, and even run your observatory 365 days a year automatically with a very small amount of work with Windows startup or task scheduling.
Modifying and Adding Targets on the Fly
You can make changes to your targets with the RoboTarget Manager even while a target is running.
– Any changes made through RoboTarget Manager will be automatically used the next time RoboTarget selects a target (does a scheduling run), even if a RoboTarget run is in progress at the time the changes are made. There is no need to stop and restart RoboTarget or click the Reload buttons. The reload buttons are only to reload information from the last scheduling run
– If you delete a target that is currently running, the running sequence will be aborted
– Any changes made through RoboTarget Manager to a running target will not affect it until it finishes the run in progress. The changes will take effect the next time the target is run.
– If you make a change to a target that has status FINISHED – it has reached 100% progress – the status is reset to IDLE and any shots added will be taken the next time the target is run
What's Next
That completes our look at the runtime operation of RoboTarget. The next blog post will look at operating RoboTarget Manager remotely.


Click Here to Leave a Comment Below
Leave a Reply: